


SikaTile®-800 Unsanded Grout (CA)
SikaTile®-800 Unsanded Grout (CA) is a premium-grade, pre-blended, polymer-modified portland cement tile grout that requires only the addition of water for mixing. For grout joints from 1.5 mm to 3 mm (1/16 in to 1/8 in). SikaTile®-800 Unsanded Grout (CA) provides colour consistent and durable grout joints and features a creamier consistency than most conventional grouts making it easier to spread.
- For 1.5 mm to 3 mm (1/16 in to 1/8 in) grout joints
- Scratch-free – no sand or silica in SikaTile®-800 Unsanded Grout (CA)
- Polymer modified for durable and professional results
- Colour consistent
- Creamy and easy to spread
- Mold and mildew resistant
- Comes in all SikaTile colours
- No VOC
- Can contribute to LEED® objectives
Usage
Suitable tile types- Ceramic tile, porcelain tile, quarry tile, mosaic tile, glass tile and cement body tile
- Natural stone tile, granite and slate
- Cement-based precast terrazzo
- Residential, commercial interior floors and walls
- Where heated floors are present (water and electric systems)
Advantages
- For 1.5 mm to 3 mm (1/16 in to 1/8 in) grout joints
- Scratch-free – no sand or silica in SikaTile®-800 Unsanded Grout (CA)
- Polymer modified for durable and professional results
- Colour consistent
- Creamy and easy to spread
- Mold and mildew resistant
- Comes in all SikaTile colours
- No VOC
- Can contribute to LEED® objectives
Packaging
4.54 kg (10 lb) box
Colour
Available in 10 colours; Refer to SikaTile® colour card for colour offering.
Product Details
APPROVALS / CERTIFICATES
SikaTile®-800 Unsanded Grout (CA) meets or exceeds ANSI A118.6 and/or ANSI A118.7
Composition / Manufacturing
Portland cement and redispersible polymers
Shelf Life
12 months from date of production when stored in the original, sealed package
Storage Conditions
Store in undamaged, original, sealed package, in dry conditions at 23 °C (73 °F). For best results, condition the product between 18 °C (65 °F) and 30 °C (86 °F) before using.
pH-Value
Between 11 and 13
Volatile organic compound (VOC) content
0 g/L
Compressive Strength
|
Shrinkage
|
Water Absorption
|
Application
Mixing Ratio
1.5 L (0.39 US gal.) per 4.54 kg (10 lb) box.
1 part water to 2 ½ parts powder (by volume)
Pot Life
~1 hour
Waiting Time
Prior to initial cleanup of the grout residue on tiles : Approximately 15 to 30 minutes depending on the type of tile or stone and ambient temperature and humidity conditions.
Yield
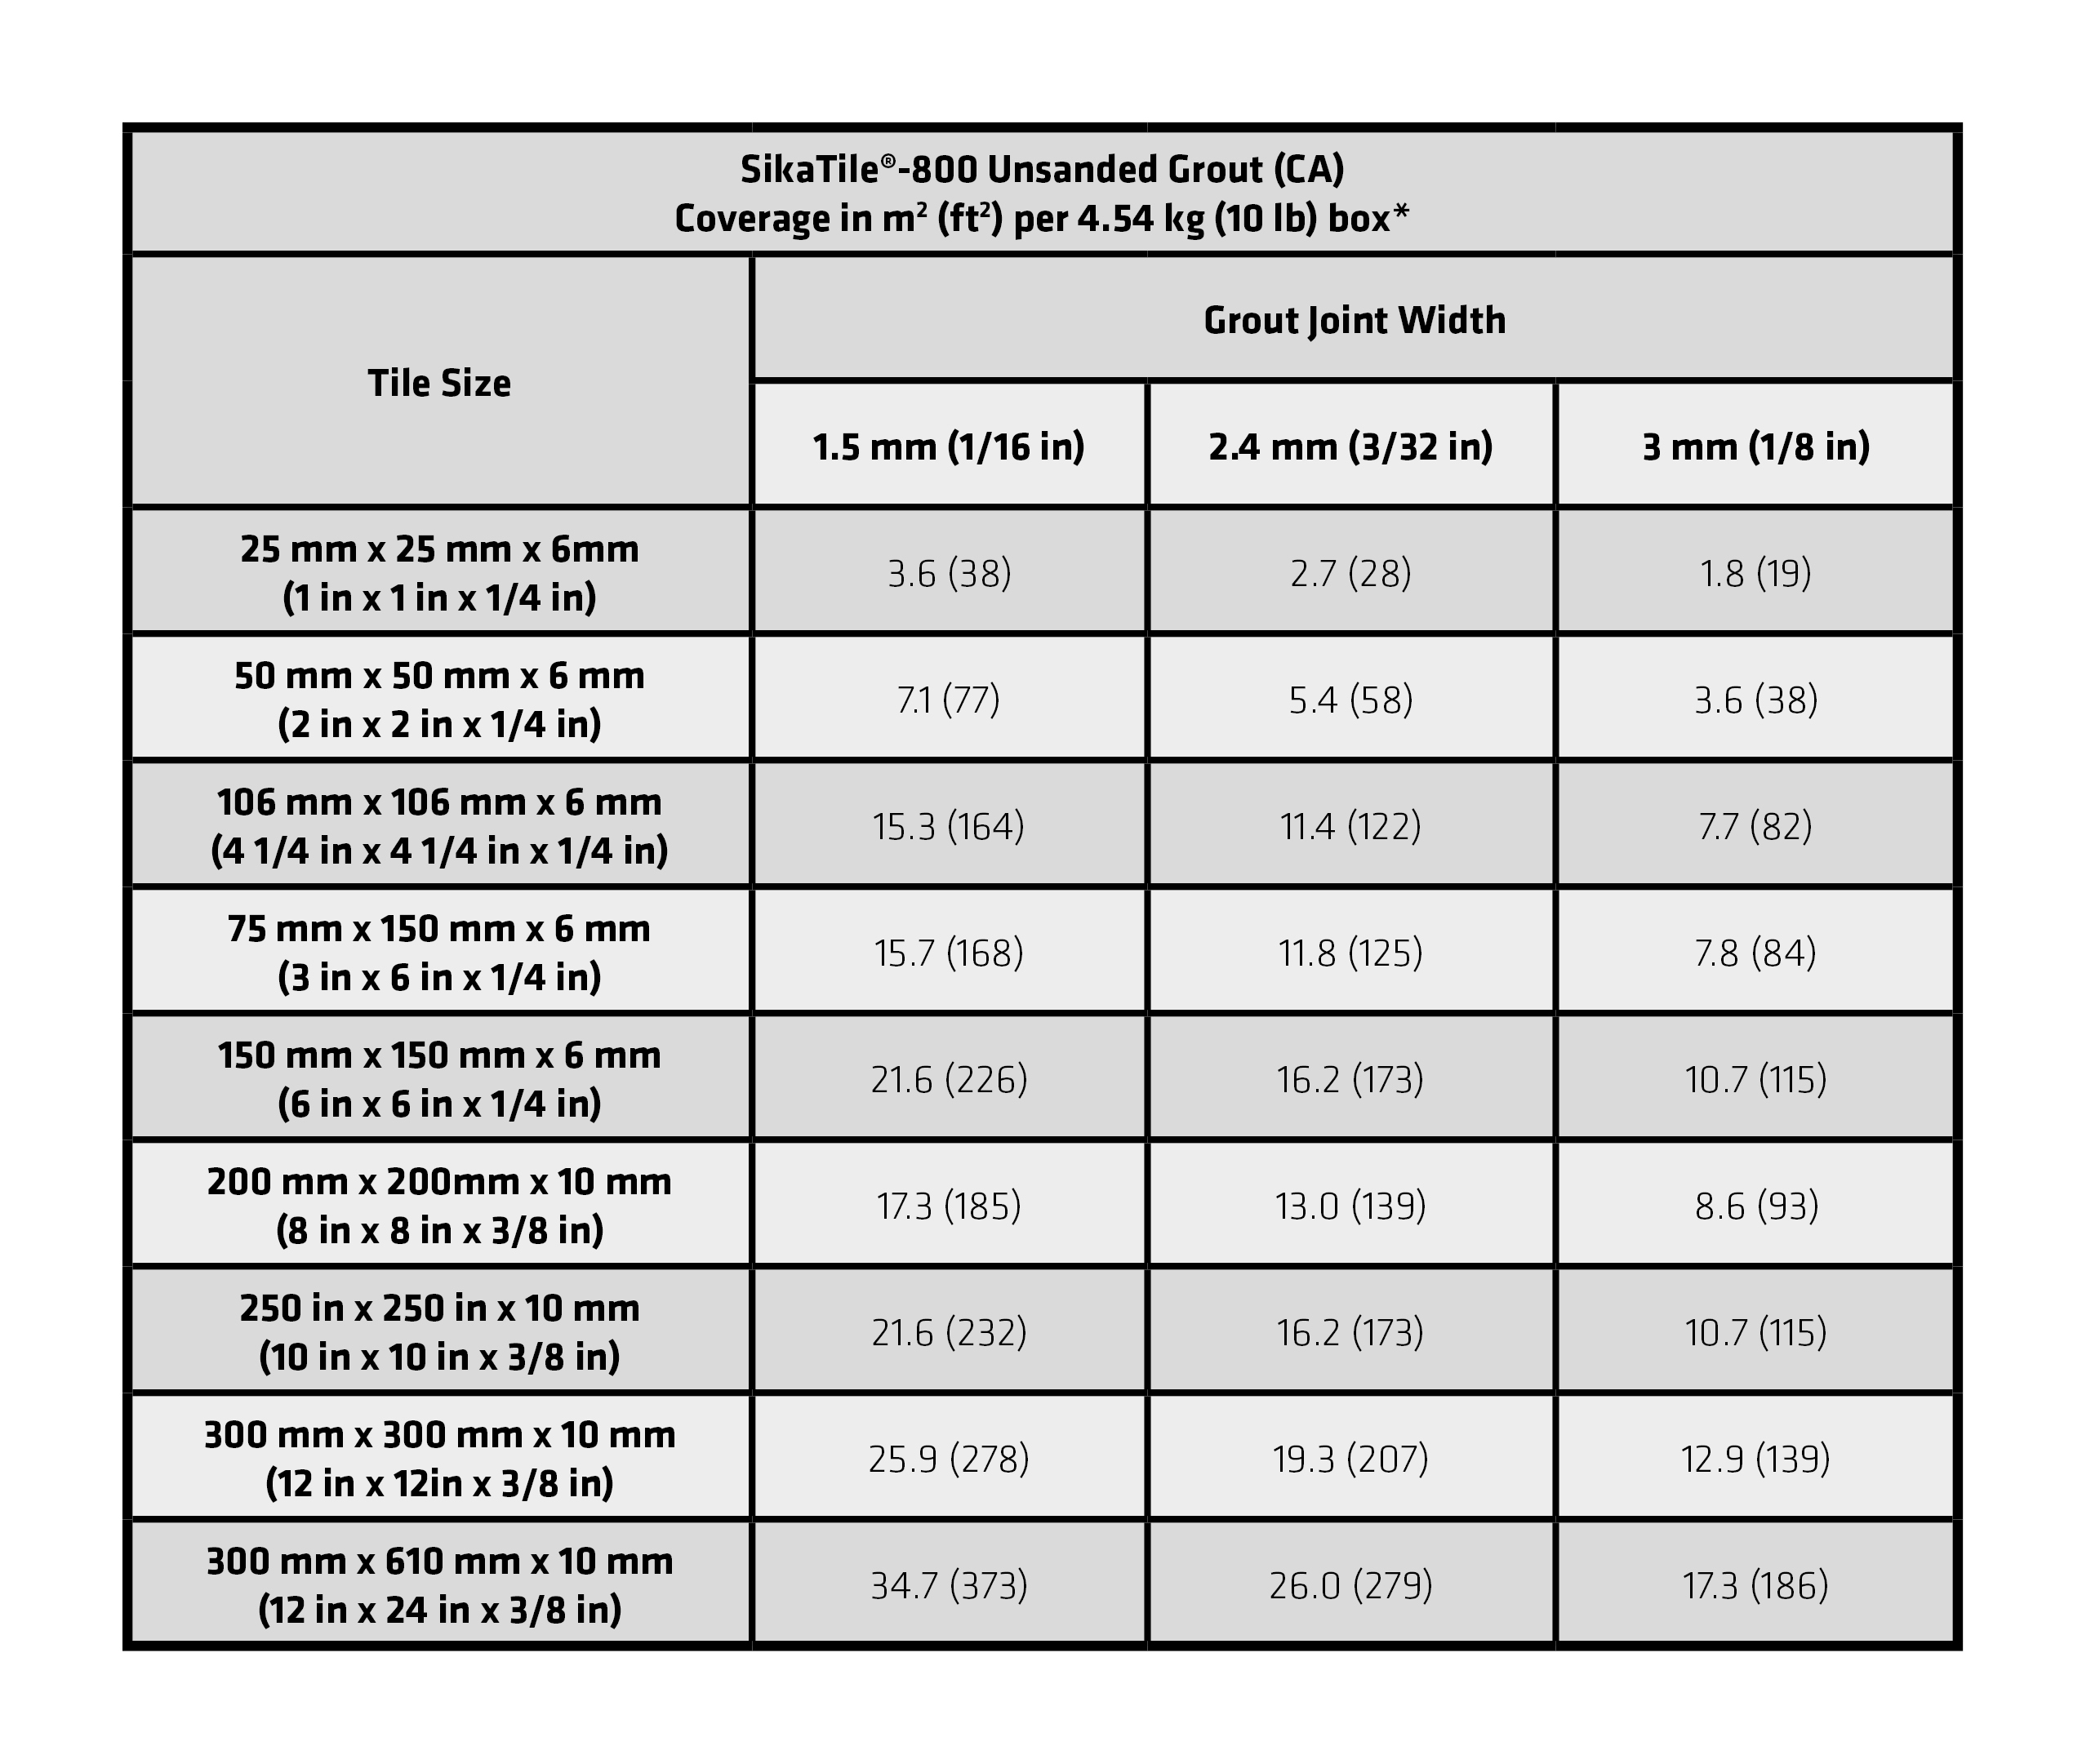
* Les taux de couverture indiqués sont fournis à titre indicatif seulement. Les taux de couverture peuvent varier selon la technique de pose, du type et de la taille des carreaux utilisés.
SURFACE PREPARATION
For best results, the temperature of the substrate or tile must be between 10 °C (50 °F) and 35 °C (95 °F) while grouting. For proper curing, maintain this temperature range for 72 hours after application. Before grouting, make sure that the tiles or stones are firmly set and that the adhesive or mortar is completely dry and remove all spacers. Grout joints must be clean and free of standing water, dust, dirt, and foreign matter. Remove excess adhesive or mortar from the joint area so that 2/3 of the tile depth is left available for grouting. Remove all spacers, pegs or ropes. Clean the tile or stone surface to remove dust, dirt, mortar, adhesive and other contaminants that may cause grout discolouration by using a vacuum with a brush attachment and agitate the surface.
MIXING
Consistency in the mixing process and in the water/powder ratio from batch to batch is essential to achieve consistent results. Before adding water, dry mix the grout to minimize colour variations that may be caused by pigment separation during shipping, especially when multiple bags of different lot numbers are used. Use clean mixing containers and clean tools.
In the mixing container, measure 1.5 L (0.39 US gal.) per box of clean, cool potable water and gradually add the SikaTile®-800 Unsanded Grout (CA) powder while mixing at slow speed. For better colour uniformity, use measuring pails to better control and maintain the same constant proportion of water and grout powder that are mixed. Have the same person mix the grout to ensure repetition of the mixing technique. Consistency in the process and in the water/powder ratio in batch to batch mixing is paramount to achieving professional results.
Mix using a slow-rotation mixer (350 rpm) until a homogeneous, smooth and easy-to-spread mixture is obtained. Do not mix too long as this will trap air, which can create pinholes and will reduce the life of the mix, which can cause the grout to harden prematurely. Let the mixture sit still (slake) for about 5 minutes, then re-mix without adding any water or powder. Continue to stir the mixture periodically as it is spread to keep grout workable, but never add water. Using an excessive amount of water for mixing or cleaning can weaken the grout joint, cause shrinkage, and produce colour variations.
Note: For best results on multiple mixes, have the same person mix the grout to ensure the repetition of the mixing technique.
APPLICATION
Note: Installation procedure should conform to ANSI A108.10 Standard recommendations.
Lightly dampen unglazed or mat tile with clean, cool water but leave no standing water in the open joint space. With a rigid sharp-edge rubber float held at a 45° angle, force grout diagonally into the joint, ensuring that the grout is well-compacted, free of voids and pin holes. Remove excess grout through successive diagonal passes using the edge of the rubber float held at a sharp 90° angle. The grout should be finished evenly to the base of the cushion or bevelled edge. Allow grout to become firm enough to only be slightly indented when pushed or approximately 15 to 30 minutes depending on the type of tile or stone and ambient temperature and humidity conditions.
Use as little water as possible during cleanup of the grout residue on the tiles. An excess amount of water used for mixing or cleaning causes weakening, shrinkage, efflorescence, pin holes and colour variation of the grouted joints. Smooth and level joints and remove excess grout from tile or stone with a slightly damp, but not wet, using a soft closed pore cellulose sponge, wiping lightly and delicately in diagonal strokes.
Do not use acid wash
Change water and rinse sponge frequently. Keeping the water and sponge clean will achieve better joint colour uniformity.
Wait at least 18 hours before removing the final haze from the tile. Removal of the dry grout haze from tile surface using a microfiber.
WAITING TIME BEFORE ALLOWING TRAFFIC
rotect the surface from impact and vibration for at least 24 hours. For proper curing, the temperature of the substrate or tiles must be at least 10°C (50°F) during the curing period of SikaTile®-800 Unsanded Grout (CA).
Protect grouted area for at least 18 hours before allowing pedestrian traffic and at least 72 hours before allowing general traffic, depending on temperature and humidity. If necessary, use load-distributing protection when moving heavy equipment over the tiled area for at least 7 days.
Note: Extended protection and downtime requirements before grouting may be required depending on temperature and humidity conditions and on the porosity and size of the tile or stone being installed.
EXPANSION AND CONTROL JOINTS
Install control joints where tiles abut restraining surfaces, around the perimeter of the work and at the base of columns and curbs. Install and space expansion and control joints in all directions in accordance with TTMAC Specification Guide 09 30 00 Detail #301-MJ recommendations.
CAUTION: Do not cout expansion joints in after the tiles have been installed. Install tiles normally and stop when the control joint location is reached. Cut the tile if required and resume setting from the opposite side of the joint. Before proceeding further, rake the joint and leave the tile and joint space clean. Do not fill expansion joint space after tiling is completed on the remainder of the job. Install a suitable industry-approved compressible bead and flexible sealant to caulk expansion and control joints.
PROTECTING NEW TILE WORK
The constructor is responsible to ensure that the structural and installation criteria as provided by the tile or stone installer can be respected. This includes allocation and provision of proper installation and protection environments needed after the installation, as well as respecting cure times before exposing the installation to work from other trades. (TTMAC’s Specification Guide 09 30 00 Tile Installation Manual).
CLEAN UP
Clean all tools and equipment after use with water. Once hardened, the product can only be removed mechanically.
