

-Pail-Packshot-2x2-02637781.png?smartcrop=1-1&width=960&height=960)
SikaTile®-850 Ultima Grout (CA)
SikaTile®-850 Ultima Grout (CA) is a professional-grade, ready-to use grout formulated using coloured quartz technology. For grout joints from 1.5 mm (1/16 in) to 13 mm (1/2 in). SikaTile®-850 Ultima Grout (CA) ensures colour uniformity, excellent stain resistance, ease of cleanability and improved workability due to its sag free consistency. In addition, SikaTile®-850 Ultima Grout (CA) will not effloresce and does not require sealing.
- Ready-to-use - Use right from the pail, without the need to mix or add water
- Reusable - Tightly close lid and store properly for reuse
- Provides hard, durable, and full grout joints for professional results
- Colour consistent with no efflorescence
- Excellent stain resistance
- No sealing required
- Will not promote mould, mildew or bacteria growth
- Comes in all SikaTile® colours
- Low VOC
Usage
Suitable for grouting the following types of tiles:- Ceramic tile, porcelain tile, quarry tile, mosaic tile and glass tile
- Natural stone tile, granite and slate
- Cement-based precast terrazzo
- Textured or mat Luxury vinyl tile (LVT)
- Residential and light commercial interior floor and walls including wet areas, bathtub surrounds, shower walls and shower floors
- Countertops and backsplashes
Advantages
- Ready-to-use - Use right from the pail, without the need to mix or add water
- Reusable - Tightly close lid and store properly for reuse
- Provides hard, durable, and full grout joints for professional results
- Colour consistent with no efflorescence
- Excellent stain resistance
- No sealing required
- Will not promote mould, mildew or bacteria growth
- Comes in all SikaTile® colours
- Low VOC
Packaging
3.78 L (1 US gal.) pail
Colour
Available in 10 colours; Refer to SikaTile® colour card for colour offering.
Product Details
Composition / Manufacturing
Emulsion polymer with additives and coloured aggregates
Shelf Life
24 months from date of production when stored in the original, unopened package
Storage Conditions
Store in an undamaged, original, unopened package, in dry conditions at 23 °C (73 °F). For best results, condition the product between 18 °C (65°F) and 29 °C (84 °F) before using.
pH-Value
Between 7 and 9
Volatile organic compound (VOC) content
49 g/L
Application
Final Set Time
| ≤ 24 hours | (ASTM C266) |
Finishing Time
Up to 30 minutes
Yield
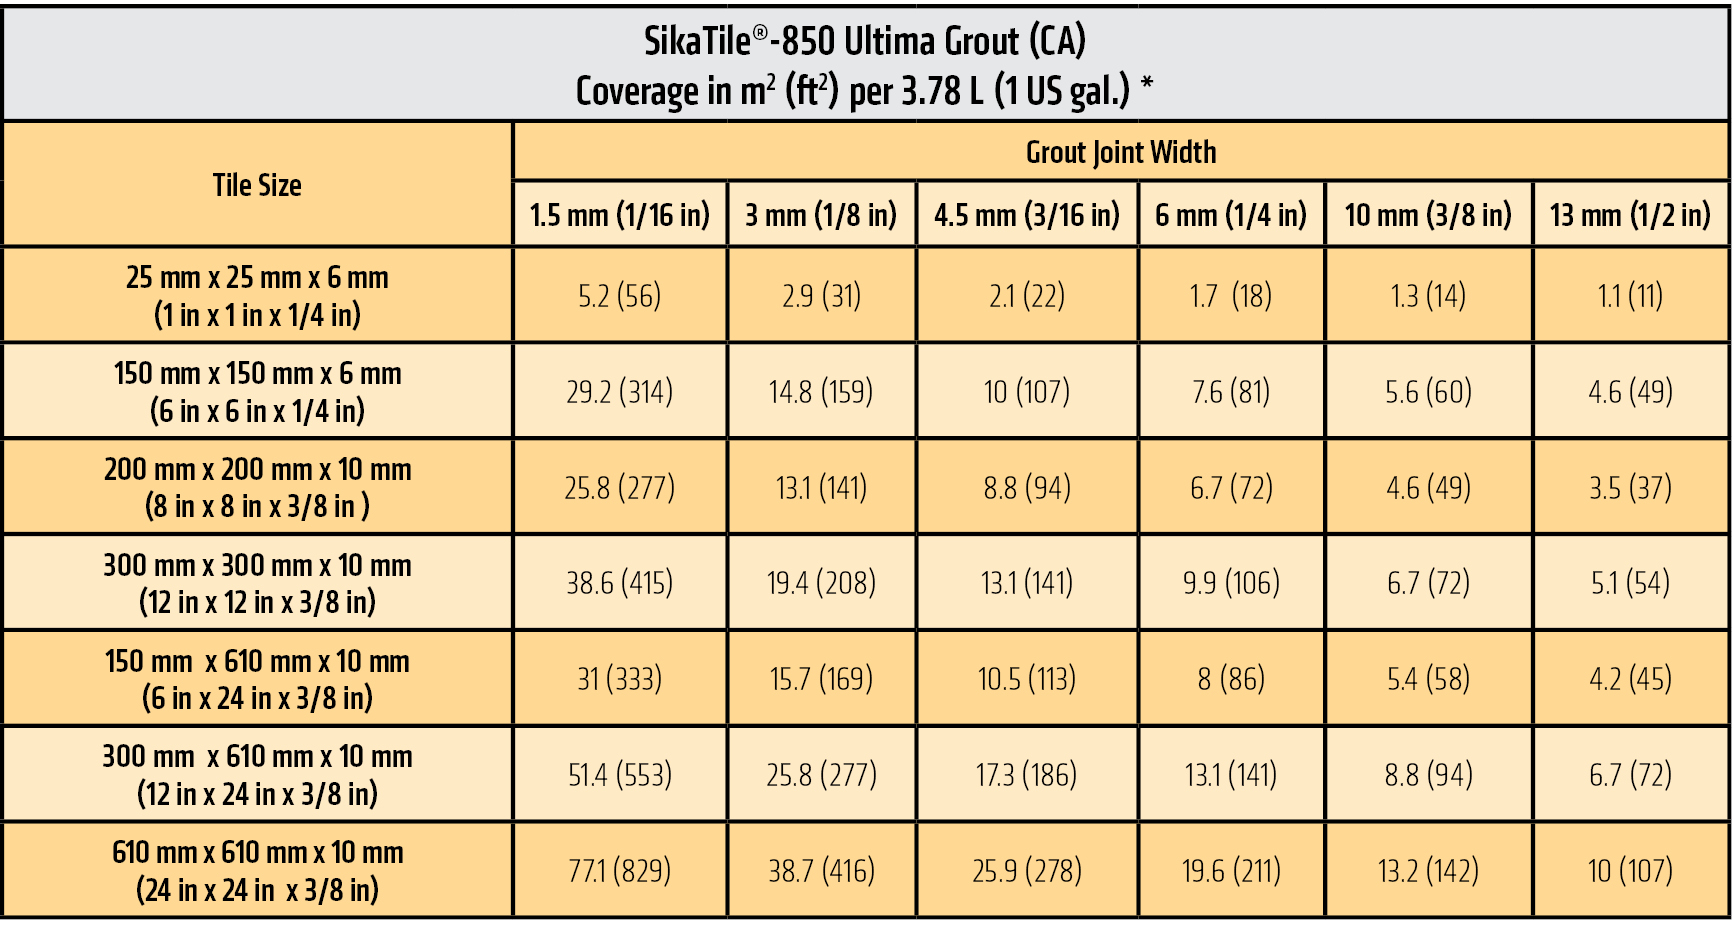 * Coverage shown is for estimating purposes only. Actual coverage may vary due to installation techniques and actual tile types and sizes used on the job.
SURFACE PREPARATION
For best results, the temperature of the substrate or tile must be between 18 °C (65°F) and 29 °C (84 °F) while grouting. For proper curing, maintain this temperature range for 72 hours after application. Before grouting, make sure that the tiles or stones are firmly set and that the adhesive or mortar is completely dry and remove all spacers. Grout joints must be clean and free of standing water, dust, dirt, and foreign matter. Remove excess adhesive or mortar from the joint area so that 2/3 of the tile depth is left available for grouting. Remove all spacers, pegs or ropes. Clean the tile or stone surface to remove dust, dirt, mortar, adhesive and other contaminants that may cause grout discolouration by using a vacuum with a brush attachment and agitate the surface.
MIXING
No mixing required
APPLICATION
Lightly dampen mat tiles with clean, cool water but leave no standing water in the open joint space. With a rigid sharp-edge rubber float held at a 45° angle, force grout diagonally into the joint, ensuring that the grout is well-compacted, free of voids and pin holes. The grout should be finished evenly to the base of the cushion or bevelled edge. Remove excess grout through successive diagonal passes using the edge of the rubber float held at a sharp 90° angle.
Allow grout to harden for about 10 to 20 minutes. Using a slightly damped cellulose sponge, loosen up all excess grout over the tile with a circular motion. Do not add water before everything is well loosened up. Clean the sponge, and then while slightly damp (not wet), gently wipe excess material from the surface using light and delicate diagonal passes.
Change water and rinse the sponge frequently. Keeping the water and sponge clean will achieve better joint uniformity and allow rinsing off the residue from the tile more efficently only leaving a small trace (i.e., a very thing film)
Wait at least 20 to 30 minutes before removing the final haze from the tile or stone surface with a slightly dampened white scrubbing pad or a microfibre towel.
Important: Do not let water sit on top of grout joints as it will interfere with the final clean up and curing, thus causing poor results.
Notes: After 24 hours, cleanup becomes very difficult. If a light film remains, it can be removed with a microfiber cloth using the palm of your hand or a white scouring pad (applying only light pressure) after lightly misting the tiles with a household glass cleaner. Carefully avoid contaminating the grout joints.
EXPANSION JOINTS AND CONTROL JOINTS
Install control joints where tiles abut restraining surfaces, around the perimeter of the work and at the base of columns and curbs. Install and space expansion and control joints in all directions in accordance with TTMAC Specification Guide 09 30 00 Detail #301-MJ recommendations.
CAUTION: Do not cout expansion joints in after the tiles have been installed. Install tiles normally and stop when the control joint location is reached. Cut the tile if required and resume setting from the opposite side of the joint. Before proceeding further, rake the joint and leave the tile and joint space clean. Do not fill expansion joint space after tiling is completed on the remainder of the job. Install a suitable industry-approved compressible bead and flexible sealant to caulk expansion and control joints.
CURING TREATMENT
Protect floors from light foot traffic for at least 24 hours and from light commercial traffic for at least 72 hours after grouting is completed. Protect walls from impact and vibration for at least 24 hours after grouting. Wait 72 hours after grouting before water exposure.
PROTECTING NEW TILE WORK
On completion of tiled floor, the user of SikaTile®-850 Ultima Grout (CA) should inform the owner/agent or general contractor that it is their responsibility to allocate provision of proper installation and protection environments needed after the installation to prevent damage, as well as respecting cure times before exposing the installation to work from other trades.
CLEAN UP
Clean all tools and equipment after use with water. Once hardened, the product can only be removed mechanically.
